This will detail how to image (or copy) a hard drive running Windows 7 and having an SRP, (aka "System Reserved Partition) which is a small 100Mb partition on the original hard drive. These instructions are for a new hard-drive of the same or even better, larger capacity than the old one.
1. Power down the computer
2. Open it up and install the new hard drive (SATA power and the SATA data cords). Leave the original hard drive in there, too, of course....
3. Power up and start Windows
4. Under the start menu, type "Disk Management", and open that program "Windows Disk Management" and you should get a prompt that the new disk needs to be initialized. Make sure you select the disk drive (check mark) and ensure "MBR" is selected, so the new drive is bootable. Note the SRP partition of the original C: drive, circled in red:
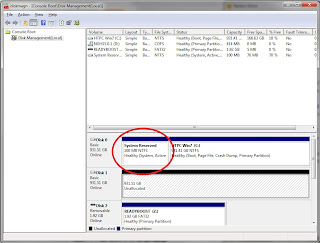
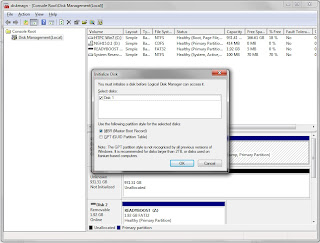
5. Restart/Reboot the machine to make the new disk visible to Norton (though it won't be visible in My Computer, yet)
6. Place the Norton Ghost 15.0 Disk into the DVD drive.
7. If it doesn't start automatically, browse to the DVD drive via "My Computer" (disc is named NGH15.0.1) and open it to see the files therein.
8. Double-click "Autorun.exe" to run it.
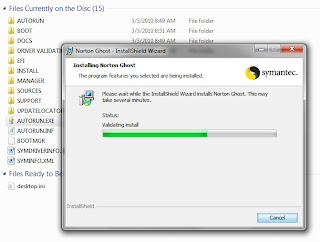
9. During the install, a few DOS command windows (black windows) will open and close on their own several times. This whole process can take more than a few minutes...maybe like fifteen or more...
10. This link HERE to the Norton forum help site has a lot of good information, but it's missing some steps and explanations that I will detail. If you don't have an SRP, then follow the instructions on the website, using the tips from this post to help you along.
11. Go to the Start Menu, Norton Ghost, and run the Norton Ghost Program. It will begin analyzing your system:
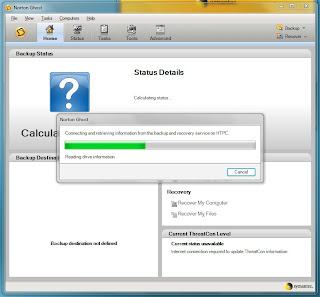
12. Once finished, click "Tools" and "Copy My Hard Drive", and "Next" on the pop-up window.
13. ensure you check "Show Hidden Drives" box. Click and select the source drive (we'll start with the "System Reserved" partition, aka SRP). Click Next.
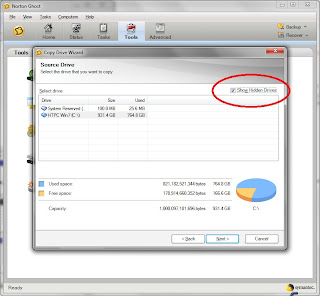
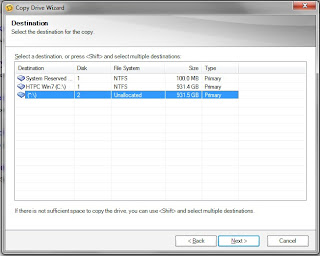
14. For Destination, select "Unallocated" (the new drive), click Next.
15. "Check": Source for file system errors
"Check": Destination for file system errors
'DON'T SELECT" Resize drive to fit unallocated space ( this will keep the size the same for the SRP) "Check": Set drive active (for booting OS) 'DON'T SELECT' Disable SmartSector copying 'DON'T SELECT' Ignore bad sectors during copy "Check" Copy MBR Destination partition type : Primary Partition Drive letter : "" (click the down arrow and "none" will be a the top of the list)
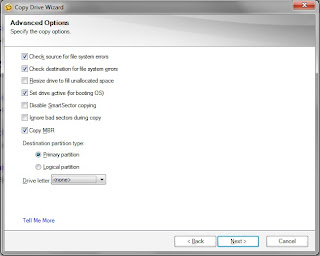
16. Click Next, and then upon reviewing the settings, select "Finish" (If you happen to go "back", double-check that the drive letter is
17. Norton Ghost will copy over the small 100Mb partition to the new drive, usually in less than two minutes. Click "Close" when finished.
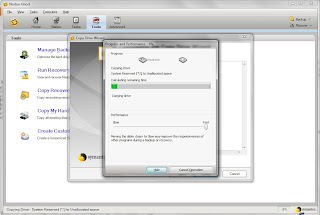
18. Now to copy the main C: drive: Click "Tools" and "Copy My Hard Drive", and "Next" on the pop-up window.
19. Click and select the source drive (usually known as "C:" drive). Click Next.
20. For Destination, select "Unallocated" (the new drive), click Next.
"Check": Source for file system errors
"Check": Destination for file system errors
"Check": Resize drive to fill unallocated space (ONLY if you want to expand the new space to fill the rest of a larger new drive)
"DON'T SELECT" Set drive active (for booting OS) Remember, the small 100MB SRP partition actually does the Booting...
"DON'T SELECT" Disable SmartSector copying
"DON'T SELECT" Ignore bad sectors during copy
Destination partition type : Primary Partition
Drive letter : (click the down arrow and "none" will be a the top of the list)
21. Wait......... a few hours, perhaps!
22.. You can move the "Performance" slide toward "Slow" if you need to use your computer for other tasks...or just leave it at "Fast" and run overnight... Make sure no other software is scheduled to do scans, etc., like a malware or virus scanner or other routine backup program.
...more to post after the image is completed in the morning!
:)

