After perusing the web for a cost-effective iTouch wall mount, I decided to try my own hand (and tight wallet ) at making my own wall mount. My iTouch from 2009 barely holds a charge, so it is to be relegated to wall duty as a WiFi sound portal for my basement billiards room and bar. Power will be from a USB plug and amplifier behind the wall.
I had a pair of
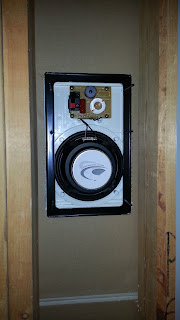
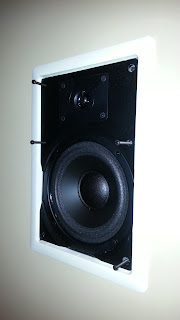
wall-speakers left over from a previous custom home build, so those were free, and mounted quickly. Fortunately, I had access to the back of the wall inside the utility room, so it was relatively easy wiring everything up, but this could be done by fishing wires inside a wall, and running them along behind the baseboards, if need be. The amp and USB power plug could also be wired easily, too, with a low voltage wire portal that exits the wires right above a wall outlet. [Probably hiding the transformers inside a wall would be do-able, but could be a cause of a very rare, but dangerous fire... just sayin'.]
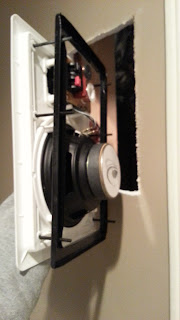 |
Add the backplate loosely, then tilt into place
|
 |
| Backside of the speaker |
 |
| Speaker mouting screws |
A
Lepai Class-T amp from Amazon was mounted on a wall stud.
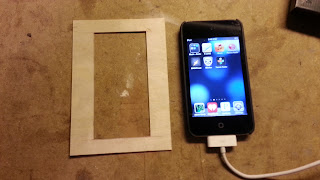
The pieces for this DIY iTouch mount were picked up at Michaels for less than $10.00.
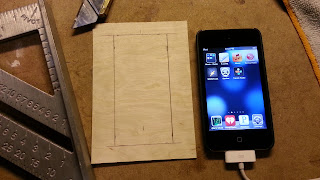 |
| Lay out the mearsurements, cut with a razor knife by scoring. |
A 3.5x5 inch wood photo frame for about $6.00, and a couple pieces of thin wood from the Michael's craft aisle. One is 1/32" thick and the other 1/16" thick. Each was about $2.00.
I cut the thinnest piece of wood to both fit the frame dimensions, and from that fitted wood a rectangular cutout to match the face of the iTouch to ensure not only the screen was fully visible, but also the camera and the front button. I sprayed a few coats of black with a hint of copper to match the frame's paint.
 |
| The mat-board all cut out, prior to paint |
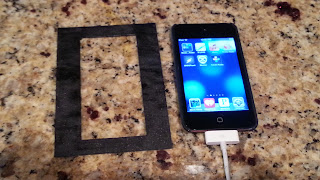 |
| After the first coat of paint... the wood grain is not noticeable in the room light. |
The iTouch was loosely fitted onto the mat-board, and small birch wood pieces cut to reinforce the iTouch on all four sides, making room for the headphone jack and the 30-pin connector.
Once fitted, the actual wood frame was marked where the wires would interfere, and notches cut to allow their exit. Since they are on the bottom, they won't be seen after the whole frame is mounted on the wall. Note the notches were painted to match the frame.
A 90-degree headphone plug had to be ever-so-gently trimmed so as not to interfere with the mat-board, while allowing the iTouch to remain flat.
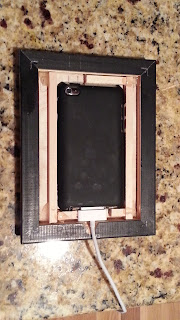 |
| 30-pin wire and frame groove... |
Measurements were made to mount to drywall screws at the appropriate width which allows the screw heads to ride inside the routed groove in the frame.
The frame was trial mounted to the wall and pencil marks made for the holes in the drywall to accommodate the headphone and 30-pin wires, making sure the holes would not protrude beyond the frame itself.
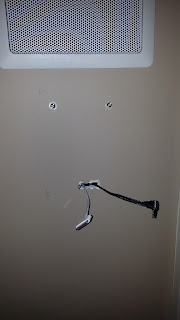 |
| Mounting screws and wiring in place ahead of time. |
Once mounted epoxy was used to hold all the pieces in place, and once dried and fitted again (don't forget to have the cables installed!), a flat piece of 1/16" wood was placed over the iTouch to unify the whole system, and not allow the iTouch to fall out or away from the frame. (Note the headphone jack cutout was not complete at the stage of this photo below...but the layout of the wood and backplate are correct).
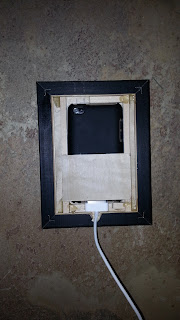 |
| Wood attachment system... headphone jack and groove not placed (yet) |
Once the epoxy dried, the whole mount was attached to the wall and hooked to the amp.
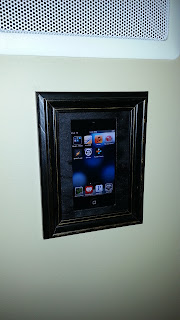 |
| Installed on the wall, ready to party! |
 |
| The whole system: iTouch wall mount and speakers |
Power up! Pandora streams loud and clear. The Lepai amp is set for max bass, and minimal treble, and set at about 90% volume setting. The actual speaker volume will be regulated through the iTouch screen.
Next stage: subwoofer, and the bass can come through the wall-mounted fresh air grill for the utility room.
Geek Out & Enjoy! Let me know if you tackle something similar yourself.


