Monday, October 7, 2013

Smart dock for Samsung Note II (and S3, S4, Note III)

Samsung Smart Dock for Note II

Samsung has now bumped up the bar for smartphones... how about a dock (ala the old laptop docks of yore) to work with your smart phone:  full-size keyboard/mouse compatible, external hard-drive storage and an HDMI port out to your modern flat-screen monitor?  What is NOT to love?  Nothing.  Three USB ports, HDMI, charing, stereo sound out, Especially for $99 retail or even less on Amazon HERE

Now I can ditch my old Asus EEE netbook, and use this Samsung Smart Dock instead... and keep one device for nearly the whole day.

Saturday, April 27, 2013

Copying Flash videos to DVD to play in a Sony Blu-Ray player

I needed some videos to play on my large screen LED TV through my Sony BDP-BX58 Blu-Ray player.  It was awkward to hook up my desktop to the fireplace mounted TV, so I needed a way to copy the Flash Video to play in my DVD player.

I found a great website with all the details, and the links to download the two programs required to 1) copy the flash video to hard-drive, and 2) convert the FLV format to MPEG.

Here's the Weblink on Videohelp.com:  How To Record Streaming Flash and Save

First, download "Downloadhelper" and also "AVIDemux"

Follow the directions on the website... give the video time to download to the temporary cache folder!

To convert to a video format that will play in the Sony DVD, convert the saved video file with the following parameters:
Video Decoder:  Lavcodec
Video Output:  Mpeg4 AVC (x264)
Audio Output:  AC3 (Aften)
Output Format:  MP4v2 Muxer
Save as an ".mp4" file


Once that's converted (takes a while), use your favorite CD/DVD burner software to burn/close it to your blank disc. 

It should read as a data disc in the Sony BR player, and can be seen in the Video crossbar menu.  Select it, and play the file. 

Sunday, March 31, 2013

How to Do a Clean Install of Windows 8 with an Upgrade Disc


How to Do a Clean Install of Windows 8 with an Upgrade Disc

Sometimes, you just need to do a clean install. Unfortunately, the Windows 8 Upgrade doesn't always allow for that, throwing you an error when you try to activate after a clean install. Reader uncommoner shows us a workaround for this issue.
If you do a clean install using the Windows 8 Upgrade Assistant, you should be fine—but if you've already formatted your drive or you're moving to a new drive, you can't do a "clean install" without installing an old version of Windows first. It'll let you install Windows 8 cleanly, but when you go to activate, you get an error 0x8007007B, saying your product key can only be used for upgrading.
If you get that error, here's how to fix it:
  1. Press the Windows key and type regedit. Press enter to open the Registry Editor.
  2. Navigate toHKEY_LOCAL_MACHINE/Software/Microsoft/Windows/CurrentVersion/Setup/OOBE/and double-click on the MediabootInstall key in the right pane.
  3. Change the key's value from 1 to 0.
  4. Exit the Registry Editor, press the Windows key again, and type cmd. Right-click on the Command Prompt icon and run it as an administrator.
  5. Type slmgr /rearm and press Enter.
  6. Reboot Windows.
When you get back into Windows, you should be able to run the Activation utility and activate Windows as normal, without getting an error. Obviously, you could use this trick for evil, but it has its legitimate place too—if, say, you're upgrading your hard drive and want to do a fresh install on it, or if you formatted your drive before upgrading.
We haven't had a chance to test it ourselves, but it's been well documented around the net, so we're confident it should work for you if you're getting this particular error. If you give it a shot, let us know how it works for you in the discussions below! Thanks for the tip, uncommoner!
Source:

Monday, March 25, 2013

DIY iPod / iTouch wall mount speaker system

After perusing the web for a cost-effective iTouch wall mount, I decided to try my own hand (and tight wallet ) at making my own wall mount.  My iTouch from 2009 barely holds a charge, so it is to be relegated to wall duty as a WiFi sound portal for my basement billiards room and bar.  Power will be from a USB plug and amplifier behind the wall.

I had a pair of wall-speakers left over from a previous custom home build, so those were free, and mounted quickly.  Fortunately, I had access to the back of the wall inside the utility room, so it was relatively easy wiring everything up, but this could be done by fishing wires inside a wall, and running them along behind the baseboards, if need be.  The amp and USB power plug could also be wired easily, too, with a low voltage wire portal that exits the wires right above a wall outlet.  [Probably hiding the transformers inside a wall would be do-able, but could be a cause of a very rare, but dangerous fire... just sayin'.]

Add the backplate loosely, then tilt  into place
Backside of the speaker
Speaker mouting screws


A Lepai Class-T amp from Amazon was mounted on a wall stud.


The pieces for this DIY iTouch mount were picked up at Michaels for less than $10.00.


Lay out the mearsurements, cut with a razor knife by scoring.


 A 3.5x5 inch wood photo frame for about $6.00, and a couple pieces of thin wood from the Michael's craft aisle.  One is 1/32" thick and the other 1/16" thick.  Each was about $2.00.

I cut the thinnest piece of wood to both fit the frame dimensions, and from that fitted wood a rectangular cutout to match the face of the iTouch to ensure not only the screen was fully visible, but also the camera and the front button.  I sprayed a few coats of black with a hint of copper to match the frame's paint.
The mat-board all cut out, prior to paint
After the first coat of paint... the wood grain is not noticeable in the room light.

The iTouch was loosely fitted onto the mat-board, and small birch wood pieces cut to reinforce the iTouch on all four sides, making room for the headphone jack and the 30-pin connector.

Once fitted, the actual wood frame was marked where the wires would interfere, and notches cut to allow their exit.  Since they are on the bottom, they won't be seen after the whole frame is mounted on the wall.  Note the notches were painted to match the frame.

A 90-degree headphone plug had to be ever-so-gently trimmed so as not to interfere with the mat-board, while allowing the iTouch to remain flat.
30-pin wire and frame groove...

Measurements were made to mount to drywall screws at the appropriate width which allows the screw heads to ride inside the routed groove in the frame.

The frame was trial mounted to the wall and pencil marks made for the holes in the drywall to accommodate the headphone and 30-pin wires, making sure the holes would not protrude beyond the frame itself.
Mounting screws and wiring in place ahead of time.

Once mounted epoxy was used to hold all the pieces in place, and once dried and fitted again (don't forget to have the cables installed!), a flat piece of 1/16" wood was placed over the iTouch to unify the whole system, and not allow the iTouch to fall out or away from the frame. (Note the headphone jack cutout was not complete at the stage of this photo below...but the layout of the wood and backplate are correct).
Wood attachment system... headphone jack and groove not placed (yet)

Once the epoxy dried, the whole mount was attached to the wall and hooked to the amp.
Installed on the wall, ready to party!
The whole system: iTouch wall mount and speakers

Power up!  Pandora streams loud and clear.  The Lepai amp is set for max bass, and minimal treble, and set at about 90% volume setting.  The actual speaker volume will be regulated through the iTouch screen.

Next stage:  subwoofer, and the bass can come through the wall-mounted fresh air grill for the utility room.

Geek Out & Enjoy!  Let me know if you tackle something similar yourself.


Tuesday, January 22, 2013

Image or Clone a new drive using Norton Ghost 15.0


This will detail how to image (or copy) a hard drive running Windows 7 and having an SRP, (aka "System Reserved Partition) which is a small 100Mb partition on the original hard drive. These instructions are for a new hard-drive of the same or even better, larger capacity than the old one.

1. Power down the computer

2. Open it up and install the new hard drive (SATA power and the SATA data cords). Leave the original hard drive in there, too, of course....

3. Power up and start Windows

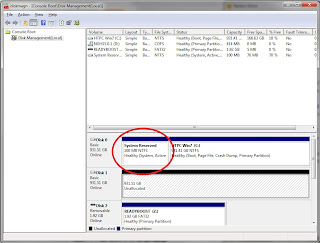
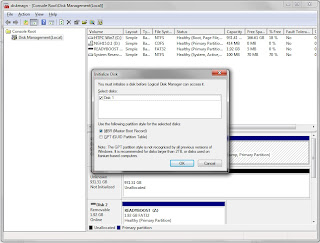
4. Under the start menu, type "Disk Management", and open that program "Windows Disk Management" and you should get a prompt that the new disk needs to be initialized. Make sure you select the disk drive (check mark) and ensure "MBR" is selected, so the new drive is bootable. Note the SRP partition of the original C: drive, circled in red:


5. Restart/Reboot the machine to make the new disk visible to Norton (though it won't be visible in My Computer, yet)

6. Place the Norton Ghost 15.0 Disk into the DVD drive.

7. If it doesn't start automatically, browse to the DVD drive via "My Computer" (disc is named NGH15.0.1) and open it to see the files therein.

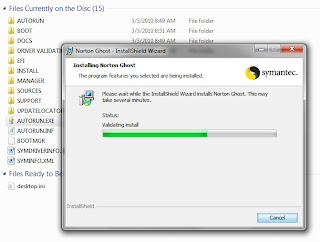
8. Double-click "Autorun.exe" to run it.


9. During the install, a few DOS command windows (black windows) will open and close on their own several times. This whole process can take more than a few minutes...maybe like fifteen or more...

10. This link HERE to the Norton forum help site has a lot of good information, but it's missing some steps and explanations that I will detail.  If you don't have an SRP, then follow the instructions on the website, using the tips from this post to help you along.

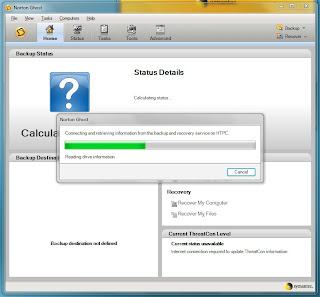
11. Go to the Start Menu, Norton Ghost, and run the Norton Ghost Program. It will begin analyzing your system:


12. Once finished, click "Tools" and "Copy My Hard Drive", and "Next" on the pop-up window.


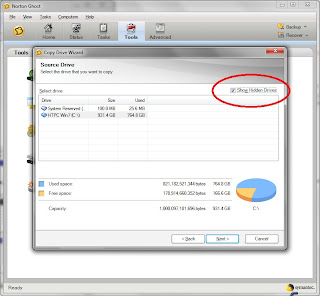
13. ensure you check "Show Hidden Drives" box. Click and select the source drive (we'll start with the "System Reserved" partition, aka SRP). Click Next.


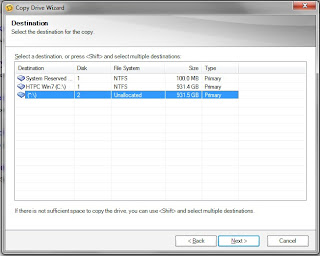
14. For Destination, select "Unallocated" (the new drive), click Next.


15. "Check": Source for file system errors

"Check": Destination for file system errors

'DON'T SELECT" Resize drive to fit unallocated space ( this will keep the size the same for the SRP) "Check": Set drive active (for booting OS) 'DON'T SELECT' Disable SmartSector copying 'DON'T SELECT' Ignore bad sectors during copy "Check" Copy MBR Destination partition type : Primary Partition Drive letter : "" (click the down arrow and "none" will be a the top of the list)


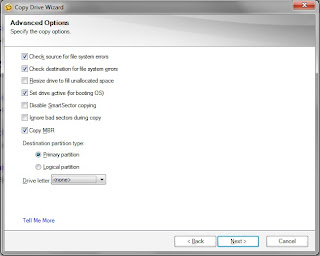
16. Click Next, and then upon reviewing the settings, select "Finish" (If you happen to go "back", double-check that the drive letter is

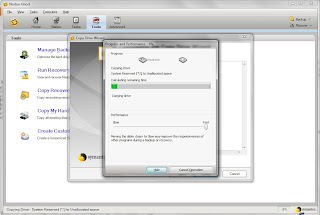
17. Norton Ghost will copy over the small 100Mb partition to the new drive, usually in less than two minutes. Click "Close" when finished.


18. Now to copy the main C: drive: Click "Tools" and "Copy My Hard Drive", and "Next" on the pop-up window.

19. Click and select the source drive (usually known as "C:" drive). Click Next.

20. For Destination, select "Unallocated" (the new drive), click Next.

"Check": Source for file system errors
"Check": Destination for file system errors
"Check": Resize drive to fill unallocated space (ONLY if you want to expand the new space to fill the rest of a larger new drive)

"DON'T SELECT" Set drive active (for booting OS) Remember, the small 100MB SRP partition actually does the Booting...
"DON'T SELECT" Disable SmartSector copying
"DON'T SELECT" Ignore bad sectors during copy
Destination partition type : Primary Partition
Drive letter : (click the down arrow and "none" will be a the top of the list)

21. Wait......... a few hours, perhaps!

22.. You can move the "Performance" slide toward "Slow" if you need to use your computer for other tasks...or just leave it at "Fast" and run overnight... Make sure no other software is scheduled to do scans, etc., like a malware or virus scanner or other routine backup program.

...more to post after the image is completed in the morning!

:)


Friday, January 11, 2013

Thursday, January 10, 2013

Arcade Machine Boot Wallpaper and Boot Logo Change

My MAME arcade, "F-14 Tomcat Arcade" needs something to make it look like its a commercial gaming unit, not a home PC booting Windows 7.

So, after doing some research there are some programs, animations and images you can load to make it look "un"-Windows.  Some require registry hacking, hex editors... bleck.  So here are the two that I settled on to get me 99% of the way:

Windows 7 Boot animation changer

(New boot animations downloadable HERE)

And to change the logon/shutdown background wallpaper go to the Julien-Mancini website, download the changer program, install it, and browse to whatever picture you want... very nice.

How to hide the "welcome" cursor in Win7, click HERE

and hide the Windows cursor altogether with Nomousy (put in the start menu).  Put a shortcut on your Start Menu, and then later use the keyboard to run it a second time to make the cursor re-appear.

Design custom (tiny!!!) cursors, so they are not apparent on boot up: RWCursor Editor

Here's my boot and windows wallpaper: